
JUEVES, 29 DE ABRIL DE 2010
Lemon Pie Tutorial
Hola!!!En agradecimiento a nuestros seguidores y las visitas que recibimos, les acercamos este tutorial que si bien hicimos hace ya un tiempo, estaba "desaparecido". Es para realizarlo en arcilla polimérica
Hello!! To thank our followers and all the visits we recieve, we bring you this tute. Although not new -we made some time ago- it was sort of "missing". It's made in polymer clay.
Este tutorial está pensado para uso personal y no comercial.
This tutorial is meant for personal use, no comercial use allowed.
MATERIALES:
- Arcila polimérica translúcida, ocre, amarilla, marrón, blanco.
- Arcilla polimérica líquida
- Pigmento, polvo o tinte amarillo para arcilla polimérica líquida.
MATERIALS NEEDED:
- polymer clay translucent, ochre, yellow, brown, white.
- liquid polymer clay
- some tint, powder or paint to go along with liquid polymer clay
PROCEDIMIENTO - PROCESS
 Para la base tomaremos una porción del color deseado (yo utilicé una mezcla de translúcido, ocre, amarillo y un poco de marrón). Estirar con un espesor de 2 o 3 mm y cortar un círculo (yo utilicé un cortante de 3 cm de diámetro).
For the base, take a piece of the desired colour (I used a mix of translucent, ochre, yellow and a bit brow). Roll the clay into a sheet 2 or 3 mm high and cut a circle (I used a 3 cm cookie cutter)
 Espolvorear almidón de maiz sobre una tapa metálica de gaseosa o cerveza (la utilizaremos como nuestro molde para hornear)
Spread some cornstarch over a metallic bottle top (you find them in soda and beers). We'll use it as our "oven tray".
 Colocar el círculo de la base dentro de la tapa y utilizar los dedos o una herramienta para hacer que la masa llegue a los bordes de la tapa.
Place the circle of clay inside the bottle top and use fingers or a suitable tool to make it each the borders.
 Llevar al horno de acuerdo a las indicaciones del fabricante (10 minutos deberían bastar). Dejar enfriar mientras nos preparamos para el próximo paso (podemos optar por dejar la base ya cocida dentro de la tapa o bien retirarla, yo prefiero esta última opción).
 Llevar al horno de acuerdo a las indicaciones del fabricante (10 minutos deberían bastar). Dejar enfriar mientras nos preparamos para el próximo paso (podemos optar por dejar la base ya cocida dentro de la tapa o bien retirarla, yo prefiero esta última opción).
Bake according the manufacturer directions for the clay (10 minutes will be enough). Let cool while we get ready for next step (we can choose to leave the pie base inside the bottle top for the next steps or to take it out; I usually take it out)
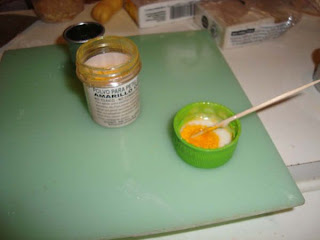 Para hacer el relleno de limón, tomaremos TLS (o cualquier otra marca de arcílla de polímeros líquida), y le agregaremos un poco de color amarillo (sólo un poco, queremos que no deje de ser traslúcido!). Yo estoy usando polvo para pétalos -de los que se usan en decoración de tortas, pero también se puede utilizar óleos, otros pigmentos en polvo o lacas vitrales.
 Para hacer el relleno de limón, tomaremos TLS (o cualquier otra marca de arcílla de polímeros líquida), y le agregaremos un poco de color amarillo (sólo un poco, queremos que no deje de ser traslúcido!). Yo estoy usando polvo para pétalos -de los que se usan en decoración de tortas, pero también se puede utilizar óleos, otros pigmentos en polvo o lacas vitrales.
For the lemon filling, we'll use TLS or any other liquid polymer clay. We'll add a little yellow colour (just a little, we want it to remain translucent!). I'm using sugarcraft podwers, but oils, other podwer pigments or glass paints can be used as well.
 Llenar la base con el relleno y hornear de acuerdo a las indicaciones del fabricante (15 minutos bastarán). Sacar del horno y dejar enfriar.
 Llenar la base con el relleno y hornear de acuerdo a las indicaciones del fabricante (15 minutos bastarán). Sacar del horno y dejar enfriar.
Fill the pie base with the lemon filling and cure according the manufacturer directions (15 minutes were enough for me). Take off the oven and let cool.
 Para la cubierta de merengue, realizar una mezcla con arcilla de polímeros líquida y arcilla de polímeros sólida blanca (usando un palito de helado, presionando la mezcla para unir ambas arcillas -líquida y sólida- hasta que tengan una consistencia cremosa). Te darás cuenta que está bien cuando puedas formar picos con un palillo. Si está muy blando, agregar arcilla sólida, si es muy dura, más arcilla líquida. Yo aprendí esta técnica gracias a Betsy Niederer ( http://www.cdhm.org/tutorials/making-a-miniature-cake.html ) y a Nora Jean ( http://www.norajean.com/Biz-Archive/food/PBandJ/PB-grp.htm ).
 Una vez fuera del horno, dejar enfriar un poco y se podrá cortar porciones del lemon pie si así se lo desea mientra aún está tibio.
 Para la cubierta de merengue, realizar una mezcla con arcilla de polímeros líquida y arcilla de polímeros sólida blanca (usando un palito de helado, presionando la mezcla para unir ambas arcillas -líquida y sólida- hasta que tengan una consistencia cremosa). Te darás cuenta que está bien cuando puedas formar picos con un palillo. Si está muy blando, agregar arcilla sólida, si es muy dura, más arcilla líquida. Yo aprendí esta técnica gracias a Betsy Niederer ( http://www.cdhm.org/tutorials/making-a-miniature-cake.html ) y a Nora Jean ( http://www.norajean.com/Biz-Archive/food/PBandJ/PB-grp.htm ).
Cubrir el relleno de limón con el "merengue" obtenido. Yo agregué unas rodajas de limón y unas hojas de menta como decoración antes de llevar nuevamente al horno, pero esto es opcional. Hornear durante otros 10 o 15 minutos y el lemon pie estará listo!!!
For the meringe cover, make a mixture of liquid polymer clay and solid white polymer clay (use an ice cream stick to make preassure on the two clays in order to force the join until reaching a creamy texture). You'll find ou when it's done for you'll be able to form "beaks" with a toothpick. If it's too hard, add more liquid clay, and if it's too soft, add more "solid" one. I learnt this technique from Betsy Niederer (http://www.cdhm.org/tutorials/making-a-miniature-cake.html) and Nora Jean ( http://www.norajean.com/Biz-Archive/food/PBandJ/PB-grp.htm ).
For the meringe cover, make a mixture of liquid polymer clay and solid white polymer clay (use an ice cream stick to make preassure on the two clays in order to force the join until reaching a creamy texture). You'll find ou when it's done for you'll be able to form "beaks" with a toothpick. If it's too hard, add more liquid clay, and if it's too soft, add more "solid" one. I learnt this technique from Betsy Niederer (http://www.cdhm.org/tutorials/making-a-miniature-cake.html) and Nora Jean ( http://www.norajean.com/Biz-Archive/food/PBandJ/PB-grp.htm ).
Cover your pie with the meringe. I add some lemon slices and some menta leaves to decorate the surface (this is just optional). Cure in the oven for another 10 to 15 minutes and your lemon pie will be ready!
 Una vez fuera del horno, dejar enfriar un poco y se podrá cortar porciones del lemon pie si así se lo desea mientra aún está tibio.
Once out of the oven, let it cool. Cut slices if you wish while the pie is still warm.
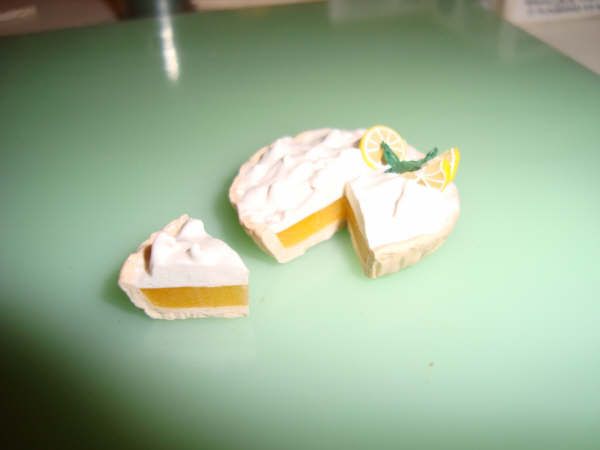
 El lemon pie cortado y su porción se verán de este modo (o incluso mejor!!!). Dar una mano de barniz brillante sobre el relleno de limón para darle aspecto húmedo.
 El lemon pie cortado y su porción se verán de este modo (o incluso mejor!!!). Dar una mano de barniz brillante sobre el relleno de limón para darle aspecto húmedo.
The sliced lemon pie will look like this (or even better!!). Apply a coat of gloss varnish over the lemon filling in order to make it look "wet".
 Eso es todo! Espero hayan disfrutado de este tutorial. Agradeceremso sus comentarios si así fue, como también toda opinión que nos ayude a hacerlo mejor la próxima vez
 Eso es todo! Espero hayan disfrutado de este tutorial. Agradeceremso sus comentarios si así fue, como también toda opinión que nos ayude a hacerlo mejor la próxima vez
That's all! Hope you enjoy this tutorial. We really apreciate your comments if you did, as well as any other opinion helping us to make it better next time.
1